🙇♀️ Thank you for considering installing Backup Brain. If you have any questions, or problems with this guide, or Backup Brain itself please file a ticket, or reach out on Mastodon. I’m happy to help.
Overview
The following is a step-by-step guide to downloading and installing Backup Brain using Docker.
If you would prefer the significantly longer, and more manual process of installing it without Docker, you should read Getting Started Without Docker, but I don’t recommend going down that route.
Unless stated otherwise all commands must be run from your downloaded clone of Backup Brain.
Upgrading from 1.x or switching from a non-docker setup
Please view the upgrading page for instructions.
Pre-Requisites
Docker
If you haven’t installed it already go to Docker.com & follow their instructions to install it.
Make sure it’s running before proceeding.
Git
In the extremely unlikely chance that you are considering self-hosting a bookmark manager but don’t have git installed, you should go to git-scm.com and follow their installation instructions.
Backup Brain
Clone the repo with git.
If you’re setup to clone with ssh then use
git clone https://github.com/masukomi/backup_brain.git
If not, use this command
git clone https://github.com/masukomi/backup_brain.git
Change into the new directory.
cd backup_brain
The main branch, which you’ve just checked out has the latest stable code. If you’d prefer you can check out the latest tagged release. See the Changelog for details on what’s here.
Configuration BEFORE First Boot
run_me_first.sh
Run the scripts/run_me_first.sh file.
./scripts/run_me_first.sh
This will
- set up a
.envfile for your Backup Brain environment variables - set up a
config/mongoid.ymlthat tells MongoDB to use an instance in docker, or on localhost. - set up a
docker-compose.ymlfile, if you’ll be using docker, and configure it for use with or without Tailscale Funnel.
Backups
By default running in docker will result in 10 minute backups. This is controlled by the DOCKER_BACKUPS key in your .env This is set to true by default.
Backups are generated via the scripts/export.sh and are stored in the mongo_exports folder and triggered during the healthcheck of the bb_mongodb container.
Meilisearch
Meilisearch is the full text search engine that Backup Brain uses to help you find your bookmarks.
If you already have a MEILI_MASTER_KEY enter it in your .env If you do not, one will be auto-generated and entered into your .env for you.
If you already have a MEILISEARCH_SEARCH_KEY and / or MEILISEARCH_ADMIN_KEY enter those as well. If you do not, we’ll have to handle that manually after the 1st boot.
Tailscale (Optional)
Tailscale offers a service called Tailscale Funnel. This is an easy, and free way to expose a Backup Brain hosted on your local network to the internet. With the free personal plan you can get a domain that’s partially chosen by you. It’ll look something like backup-brain-docker.tailaA426.ts.net. If you’re willing to pay them, and are willing to futz with DNS records you can have whatever domain you want.
The following assumes you’ve copied the docker-compose-with-tailscale.yml to docker-compose.yml using the run_me_first.sh script or manually.
New Tailscale Users
⚠️️ WARNING: if you’re not already using Tailscale there’s currently (July 2024) a bug in their onboarding system. Tailscale’s main product is all about connecting multiple machines. Their onboarding system doesn’t account for the fact that you don’t need multiple machines for funnel to be useful. So even after setting up a new machine as per the following instructions it’ll continue to show you the new user wizard every time you sign in and make it seem like it forgot your stuff. You can ignore this.
There should be a link at the bottom to tell it to skip the onboarding. If not, just go to your “Machines” page directly https://login.tailscale.com/admin/machines You do not need to install anything. The docker container will take care of that for you.
Configuring
Once you’ve created an account on TailScale you’ll need to generate an Auth Key.
The instructions below are summarized from This page on the tailscale site. If they don’t match up with current reality anymore please file an issue and I’ll update it.
- Go to the Tailscale Admin Dashboard.
- Click on the “Settings” tab along the top.
- Click on “Keys” in the left navigation bar that appears.
- Click on the “Generate auth key” button.
- Choose a name for your new auth key.
⚠️ NOTE: whatever you choose here will become the beginning of your public domain name. For example, if you name your key
bb-dockerthen your domain name will be something like this.
Write this name down, we’ll need it again.https://bb-docker.talia_autogenerated_string.ts.net ^^^^^^^^^ - Do not toggle the “emphemeral” setting. You can leave “Reusable” and “Tags” alone, or not. Those don’t matter.
- Click “Generate key”
- Write down the expiration date. You’ll probably want to make a calendar reminder to generate a new key before then.
- Copy the generated key Maybe put it in your Password Manager. You won’t see it again after you close the dialog.
- Edit the
docker-compose.ymlfile with your favorite text editor and set the following items:-
AUTH KEY replace
<YOUR TAILSCALE AUTH KEY>with your tailscale API Auth Key.For example this line:
- TS_AUTHKEY=<YOUR TAILSCALE AUTH KEY>would become something like this:
- TS_AUTHKEY=tskey-auth-abc123456-DEFGHI123NOTE: Auth all Tailscale Auth keys have an expiration date. The longest you can create one for is 90 days. You should probably make a calendar reminder to generate a new auth key in 85 days.
-
Hostname Hostname in the
bb_tailscalesection ofdocker-compose.ymlwill need to match the name you gave your Auth Key.For example this line:
hostname: <YOUR AUTH KEY NAME>becomes something like this:
hostname: backup-brain-docker
-
There’s only one more step to configuring Tailscale but it’ll have to wait. We won’t know the generated domain until after we’ve launched the Docker container and it’s talked to Tailscale’s servers. See Configuration After First Boot below for details.
Starting & Stopping The Containers
The following commands should be run from the command line after changing directory to the root of your Backup Brain.
Starting the containers
To start it in the foreground run the following.
docker compose up
I recommend running it in the foreground for the first boot, so that you can more easily stop it and configure the additional Meilisearch keys for security (see below).
To start it in the foreground run the following
docker compose up -d
After starting this once, you should see a backup_brain container listed in Docker Desktop. You should be able to click on the “play” button on the same row to start it in the future.
Stopping the containers
If it’s running in the foreground (spewing stuff onto your console) you can stop it by hitting ^c That’s control (not command) + c.
If it’s running in the background you can stop it by running
docker compose stop
You can also stop it by pressing the “stop” button next to the backup_brain container in Docker Desktop.
Note: the bb_rails service waits until the 10 second timeout and then gets forced to close by Docker. There’s an open ticket for this, & I’d really appreciate the input of anyone more versed in Docker than me to help make it shut down gracefully.
Configuration AFTER First Boot
Once you’ve started up the containers the first time…
Meilisearch Security Enhancement
What we’re doing
This step is optional, but strongly encouraged if you are planning on exposing your Backup Brain to the wider internet.
If you don’t do this the MEILI_MASTER_KEY will be used for all communications with Meilisearch. They specifically recommend against this. So, we’re going to use that master key to ask Meilisearch to give us the default search & admin keys, and use those going forward.
How to do it
First copy the MEILI_MASTER_KEY from your .env file.
In a separate console run the following to open a shell in the Rails container, and then connect to the rails console.
Opening a shell in the Rails container:
docker exec -it bb_rails bash
Change to the app directory, and launch the rails console. Note that launching the rails console will take a stupid-long time. I don’t know why.
Opening the Rails console:
cd /app
bundle exec rails console
Make sure your master key is set correctly and has made its way to rails.
ENV['MEILI_MASTER_KEY']
That should output your master key. If it doesn’t you need to exit, exit again, and go address the configuration issue in your .env file.
Ask Meilisearch for the default keys
Search::Client.instance.get_default_keys(ENV['MEILI_MASTER_KEY'])
That will return a Hash that looks like this:
{:search=>"your search api key",
 :admin=>"your admin api key"}
Type exit to leave the Rails console, and exit again to leave the docker shell.
Change the values of MEILISEARCH_SEARCH_KEY and MEILISEARCH_ADMIN_KEY in your .env file to match the corresponding values in the hash above.
To do so, uncomment these lines in your .env file (remove the #) and append the keys that were in the hash above. There should be no spaces or quote marks.
#MEILISEARCH_SEARCH_KEY=
#MEILISEARCH_ADMIN_KEY=
Then restart the bb_rails container.
docker-compose restart -t 5 bb_rails
Tailscale Domain Configuration
Finding Your Domain name & Telling Backup Brain about it
I’m going to assume you’re using the free plan, and are stuck with whatever domain name they give you, based on the name of your key.
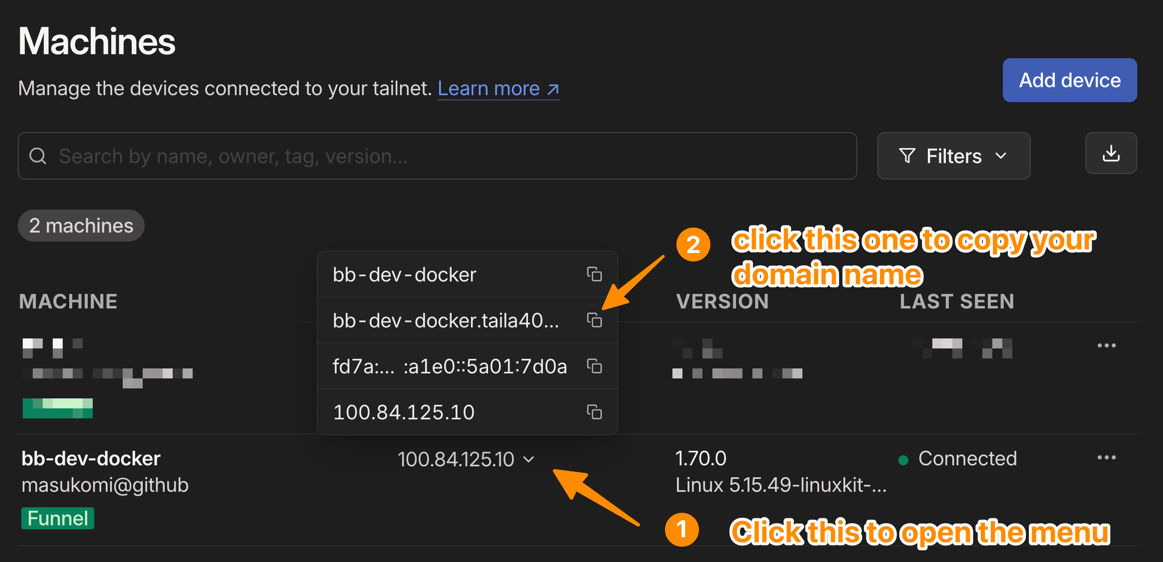
After starting the Docker containers (see below) a new machine should appear on your Machines page.
- Look for the new machine with the same name as your auth key.
- Click on its address to reveal a menu.
- Click on the little icon to the right of the row with your full domain name to copy it.
See image below. This should be the 2nd row. The first row is usually your Auth key name. The second row is the Auth key name followed by
.taliaSomethingAutoGenerated.ts.netFor example, if your Auth key was “bb-docker” it might look like thisbb-docker.talia2a462.ts.net - edit your
.envand- set
HOST_NAMEto match this domain name. For example, with the domain above, the line would look like this:HOST_NAME=bb-docker.talia2a462.ts.net - change the
HOST_USES_SSHline to:HOST_USES_SSH=true
- set
- restart your backup brain rails container from the command line
docker-compose restart -t 5 bb_railsAlternately just stop and start all the containers (see above). - Go to that domain name, and bookmark it in your browser’s toolbar for easy access. You’ll need the domain name to configure browser extensions too. See Helpers for more details on Bookmarks & Browser extensions
Visiting / Viewing Your Backup Brain
After starting the containers wait until you see output from backup_brain-bb_rails specifically you’re looking for a line that says
VISIT YOUR BACKUP BRAIN AT <URL HERE>
A little below that there’ll be a line about Listening on http://0.0.0.0:3334
That’s the indicator that everything’s completed startup in the Rails app.
Pro Tip: You can view Backup Brain’s output without the output from the other containers in the Docker Desktop app. To do this click on the little triangle to the left of the running “backup_brain” container, then click on the three vertical dots to the right of bb_rails. What you’re looking for should be at the bottom of the “Logs” tab if you haven’t visited your Backup Brain yet.
Note that when visiting your Backup Brain the 1st time, the first request will take a long time. It’s populating database info. All future requests should be very quick after that. Please file a bug if they’re not.
Without Tailscale
If you have NOT configured Tailscale (see above) you should be able to access your Backup Brain at http://localhost:3334
Please note that your Backup Brain will not be accessible from outside your local network without using a tunneling service similar to Tailscale Funnel.
With Tailscale
Visit https://<your_tailscale_domain> in your browser.
Next Steps
First: 🙇♀️ Thank you for going through all that. Second: Congrats! You’re done.
Check out Your First Bookmarks for information on how to create new bookmarks, and import existing ones.
Check out Helpers to learn how to get the Bookmarklet and / or Chrome & Firefox extensions to make adding bookmarks easier.